Sunday, January 29, 2012

Blood Orange, Beet, and Fennel Salad

When I was younger I was a super picky eater. I wouldn't even eat spaghetti sauce or onions, let alone things like beets. Up until today, I don't think I'd every really given beats a shot, and I desperately wanted to change that. As my mom and I were perusing through a recent Bon Appetit magazine, we were both super excited to see this recipe. My mom was craving blood oranges, and I was wanting to try beets, and neither of us had ever tried fennel before. 

Let me tell you, this salad was incredible. In my first bite I wanted to be sure to get a bite with a little of everything, and I was so surprised as to how well each flavor complemented each other. The recipe below is a half recipe, and it made three perfect portions. I actually forgot to add the olive oil, and added a few drips to a bite later on, and I would be equally happy with or without it. This salad is so different from anything I've tried before, and I'll definitely be making it again!


Isn't that the prettiest salad you've ever seen? I think so!


Blood Orange, Beet, and Fennel Salad

Ingredients

2 medium red beets, tops trimmed
2 blood oranges
1 medium navel orange (preferably Cara Cara)
1 1/2 teaspoon fresh lemon juice
1 1/2 teaspoon fresh lime juice
1/4 small fennel bulb, very thinly sliced 
1/4 small to medium red onion, very thinly sliced
Good quality extra virgin olive, pumpkin seed, or walnut oil for drizzling (optional)
Coarse sea salt, such as fleur de sel or Maldon sea salt, and freshly ground black pepper
1/4 cup chopped fresh cilantro 

Directions


Preheat oven to 400°F. Thoroughly wash beets, leaving some water on skins. Wrap individually in foil. Place on a rimmed baking sheet and roast until beets are tender when pierced with a knife, about 1 hour. Let cool.

Meanwhile, using a sharp knife, cut all peel and white pith from all oranges; discard. Working over a medium bowl, slice the blood oranges crosswise into thin rounds, and cut between the membranes of the naval orange to release segments into bowl; squeeze juice from membranes into bowl and discard membranes. Place sliced oranges in the bowl. Add lemon juice and lime juice; set aside. 

Carefully peel cooled beets. Slice crosswise into thin rounds. Strain citrus juices; reserve. Layer beets and oranges on plates, dividing evenly. Arrange fennel and onion over beets. Spoon reserved citrus juices over, then drizzle salad with oil if desired. Season to taste with coarse sea salt and pepper. Let salad stand for 5 minutes to allow flavors to meld. Garnish salad with cilantro leaves.

Recipe Source: adapted from Bon Appetit

Thursday, January 26, 2012

Crawfish Dip


I honestly can't take any credit for finding this dish. I didn't even buy the ingredients, but I did make it, so that has to count for something. During my first ten minutes with my family my mom showed me this recipe and told me she already had everything to make it. Easy peasy for me, since I didn't have to go shopping at three or four grocery stores to find what I needed. We ended up toasting some sourdough bread instead of the baguette, because our french bread sadly went bad really fast. Silly warm humid climate. This was pretty much all we ate for dinner, because it was so delicious. With a glass of sweet tea, it was the perfect southern treat. This dip would be awesome for Super Bowl Sunday or a Mardi Gras party!

Crawfish Dip

Ingredients

1/2 cup butter
1 bunch green onions sliced (about 1 cup)
1 small green bell pepper, diced
1 (1 lb.) package frozen cooked, peeled crawfish tails, thawed and undrained
2 garlic cloves, minced
1 (4 oz.) jar diced pimiento, drained
2 tsp. Creole seasoning
1 (8 oz.) package cream cheese, softened
French bread baguette slices
Sliced green onion and parsley to garnish.

Directions

Melt butter in a Dutch oven over medium heat; add green onions and bell pepper. Cook, stirring occasionally, 8 minutes or until bell pepper is tender. Stir in crawfish and next 3 ingredients; cook, stirring occasionally, 10 minutes. Reduce heat to low. Stir in cream cheese until mixture is smooth and bubbly. Serve with toasted French bread slices.

Recipe Source: Adapted from Southern Living: February 2012

Tuesday, January 24, 2012

Magic Cookie Bars


Wow, have I already been home for five days? Time sure does fly when you're lazy and tired all the time. Trying to recover from a 14 hour time difference hasn't been totally easy. Today is the first day I actually feel a bit normal and a lot less tired, and last night was the first night I got a full night's sleep without the aid of naps during the day or a sleeping pill. Jetlag aside, it has been wonderful being back in America. I've enjoyed spending time with my family by watching movies, playing games, shopping (yay!), and of course eating. Boy have we been eating. My awesome mother has been saving a turkey for me since November and we had Christmas and Thanksgiving this past weekend. We had turkey, mashed potatoes, homemade bread, stuffing..the works. I was too tired to really help much, and slept nearly the whole time the turkey was cooking, but the whole house smelled like the holidays when I woke up. It was wonderful. 

Last night after a day of shopping (boot sale!) my mom and I stopped by Kroger on the way home to pick up two ingredients we needed to make these bars. Of course we ended up getting more (it was apparently a day of sales). I remember my mom making these for me and my sister when we were little and for some reason I can't remember the last time I had them. It had to have been when we were living in southern Mississippi, which was at least 5 years ago. Because my mom made them, I think I just assumed it was her special recipe, and that this elusive recipe had to be found by searching old recipe card holders. Thankfully, that was not the case. My mom never used a recipe, because she just knew how to make them. I now understand why. These are seriously SO EASY to make. The hardest part is melting the butter and mixing it with the graham crackers. After that you just pour the milk, dump the ingredients on top and bake it. Half an hour later you are left with an amazingly decadent bar that you will not forget. Cut yourself a square and pour a glass of milk!

Magic Cookie Bars
Adapted from All Recipes

Ingredients

1/2 cup butter, melted
1 1/2 cups graham cracker crumbs
1 (14 oz) can sweetened condensed milk
2 cups mini chocolate chips 
1 1/3 cups flaked coconut 
1/2 cup toffee bits
1/2 cup chopped nuts (I used pecans)
1 square unsweetened bakers chocolate, melted.

Directions

Heat oven to 350˚F (325˚F for glass dish) . Coat 13x9-inch baking pan with cooking spray.

Combine graham cracker crumbs and melted butter, and press into bottom of prepared pan. Pour sweetened condensed milk evenly over crumb mixture, and gently spread with a rubber spatula. Layer evenly with chocolate chips, coconut and nuts. Press down firmly with a spatula. 

Bake 25 minutes or until lightly browned. Once out of the oven, drizzle with unsweetened chocolate. Cool, then cut into bars. Store covered at room temperature, or freeze for later.

Sunday, January 15, 2012

Carrot Soup with Miso and Sesame


THREE MORE DAYS until I'm home in Mississippi with my family. I can't wait. It has been an incredibly long seven months here in Beijing. Since I wasn't home for Thanksgiving or Christmas I'll have both when I get home, including a big turkey dinner. My mom and I will be cooking up a storm, and I can't wait. It will be nice to have access to an actual oven, not the "easybake" oven I have here (aka toaster/convection oven). I already have a list started for all the things I want to make while I'm there, so stay tuned!

The second I saw this soup on Smitten Kitchen I knew I had to have it. First of all, I love carrot soup, second, if Deb doesn’t love carrot soup but loved this one it has to be good, and third, I knew it would be easy to get the miso and sesame. HELLO...I am in China after all, and there’s a Japanese grocery store down the street.  Being that we’re all still recovering from Christmas binges, this soup is perfect for those of us who made resolutions to eat better.

Carrot Soup with Miso and Sesame

Ingredients

Soup:
2 tablespoons olive oil
2 pounds carrots, peeled, thinly sliced*
1 large onion, chopped
4 large or 6 medium cloves of garlic, peeled and smashed (naturally, I did 6 large. I love garlic)
1 tablespoon finely chopped or grated ginger, or more to taste (could easily be doubled)
4 cups vegetable broth
¼ cup white miso paste

To finish:
Drizzle of toasted sesame oil
2 scallions very thinly sliced

Directions

Heat oil in a heavy saucepan over medium heat. Add carrots, onion, and garlic, and sauté until onion is translucent, about 8 to 10 minutes. Add broth and ginger; bring to a boil. Cover and simmer about thirty minutes, or until carrots are tender.

Carefully puree soup in a blender in batches, blending in the miso during the last batch. Return soup to the pot, and season with salt and pepper (I found that the miso was salty enough, so I didn’t add any salt).

Ladle into bowls and garnish with a TINY drizzle of sesame oil and a small amount of scallions.

What you see in the picture I took was my bowl of soup, where I added way too much oil. It just needs a teensy bit to reach carrot miso sesame perfection. I even tried some without the oil and it was still very flavorful.

*Save the peels! I always save scraps of onions, carrots, and celery (especially the leaves), and put it in the freezer. Once I have a bag full, which doesn’t take long, I use the scraps to make stock.

Recipe Source: adapted from Smitten Kitchen

Thursday, January 12, 2012

Applesauce Granola


When I hit up the expat stores I always have to laugh when I see that little bag of granola for roughly $6. Are you kidding me? What a rip off. How can people spend that much money when it costs pennies to make it yourself? Well, the answer is obvious: they just don’t know any better. I never made my own granola until I moved to Beijing. It just never occurred to me that I could make it myself. Even when I move back to America, I will never buy granola again. It’s insanely easy to make, fun to experiment with, and it’s comforting to know exactly what’s in the food you’re eating.

I enjoyed this granola with some vanilla yogurt this morning. It’s not super sweet, and I like that the fruit is what makes it sweet. I chose to make a granola with applesauce simply because I had some in the fridge that needed to get used. Plus, by using applesauce, it reduced the amount of oil you find in most granola recipes. I’m not going to say this is my favorite granola, because there are so many combinations I haven’t tried yet, and I don’t want to make any promises I can’t keep. However, for a basic granola recipe this one’s definitely a keeper!


Applesauce Granola

Ingredients

4 cups old fashioned oats
1 ½ teaspoons cinnamon
¼ tsp salt
½ cup applesauce
¼ cup plus 2 tbs honey
1 tablespoon olive oil
1 tablespoon vanilla
¾ cup dried fruit (I used dry cranberries)

Directions

Preheat oven to 350˚F. Lightly grease a sheet pan, or spray with cooking spray.

In a large bowl, combine oats, cinnamon, and salt. In a small saucepan, heat the applesauce, honey, olive oil, and vanilla. Combine both mixtures and pour onto prepared sheet pan. Bake for 20-25 minutes or until golden brown, stirring every 5 minutes.

Remove from oven, fold in fruit, and press into the pan. Let cool, then break into chunks.

Recipe Source: inspired by: Yummly

Tuesday, January 10, 2012

English Cottage Pie


Sometimes I get so frustrated when I go grocery shopping here, because I often can’t find the ingredients I want. Today I went to the store to try and find canned whole tomatoes (this was my second attempt, FYI), a basic ingredient that I would be able to find in any grocery store in America. But alas, I did not find the tomatoes, so the pork Bolognese will just have to wait until I can hit up Carrefour or the expat grocery. I was able to find some other ingredients for a soup I plan on making soon, and also the ingredients to make this English Cottage Pie, so it wasn’t a totally wasted trip. 

An English Cottage Pie is a British pub-food staple, and boy is it good. The bottom layer is ground meat and veggies, and the top layer consists of cheesy mashed potatoes. This is a great use for leftover mashed potatoes, or you can easily make the potatoes while you’re preparing the meat. The original recipe calls for ground beef, but all the ground beef I can find here is virtually half fat, so I went for what I think is ground pork instead. I would’ve also loved to use the mushrooms, but Chris isn’t a huge fan, so I added a bit of celery instead. This dish is definitely comfort food at its best.

English Cottage Pie

Ingredients

1 tablespoon all-purpose flour
1 tablespoon butter, softened
Cooking spray
1 ½ cups chopped onion, about one medium
½ cup chopped carrot
½ cup chopped celery
2 cloves garlic, minced
1 pound extra-lean ground pork (beef or turkey will also work)
2 tablespoons no salt-added tomato paste
1 cup beef broth
¼ teaspoon ground black pepper
¼ cup chopped fresh parsley
1 tablespoon fresh thyme leaves
½ teaspoon salt
3 cups mashed potatoes
¾ cup (3 ounces) shredded sharp cheddar cheese, divided

Directions

Preheat oven to 350°F.

Combine flour and butter, stir well and set aside. Heat a large nonstick skillet over medium. Coat pan with cooking spray. Add onion, carrot, and celery; sauté 5 minutes. Add garlic and sauté for an additional 2-3 minutes. Remove veggies from the skillet. Add pork to pan; cook 5 minutes or until browned, stirring to crumble. Stir in tomato paste, and cook 3 minutes. Stir in broth and pepper. Return veggies to pan, and bring to a simmer. Stir in parsley, thyme, and salt. Add flour mixture, and cook for 1 minute or until thick, stirring constantly.

Spoon meat mixture into an 8-inch square glass or ceramic baking dish coated with cooking spray, spreading evenly. Combine the potatoes and half of cheese, and spread the potato mixture evenly over the meat mixture. Top with remaining cheese. Bake at 350° for 20 minutes or until bubbly. During the last couple of minutes I chose to put it under the broiler to make the top a little crispy.

Wednesday, January 4, 2012

Spiced Carrot Muffins


Chinese people have a very different idea of what breakfast should be. Basically, they eat the same meal as lunch and dinner, or if you go the baked route, you'll find some kind of pastry with dried meat on it (blech). I don't know about you, but that just doesn't sound good to me, and noodles and dumplings don't do it for me so early in the day. We travel a lot for this job, and are in fact leaving today for another trip. Sometimes the travel isn't so bad, other times (like today) we have to take a 15-20 hour train to get to our final destination! Usually the trains are overnight, so we can sleep through a large chunk of the time, however, when I wake up I don't want the questionable blue egg or soy tofu something. So, for these trips I almost always bake a batch of muffins because they're easy, delicious, and travel well (speaking of traveling, I will be in America two weeks from today! I couldn't be more excited to visit with family and friends). 

These muffins were very tasty. I love using yogurt (or sour cream) in my muffins, as it replaces the oil, and helps keep the muffins super moist. These muffins are also not at all too sweet, which I prefer in a breakfast muffin. Next time I make these I think I will try adding raisins and use brown sugar instead of granulated, so it will be a little closer to carrot cake. You can also freeze the batter in the muffin cups, for up to three months. Keep in mind the baking time will be closer to 30 minutes.

Spiced Carrot Muffins
Adapted from Martha Stewart

Ingredients

1 3/4 cups all purpose flour
1/2 cup sugar
2 teaspoons pumpkin pie spice*
2 teaspoons baking powder 
3/4 teaspoon baking soda
1/2 teaspoon salt
3/4 cups plain yogurt
4 tablespoons melted butter
1 large egg
2 cups peeled, finely shredded carrots (about 5 medium)

Directions

Preheat oven to 375˚F. Grease 12 cups of a standard muffin tin or line with paper liners; set aside. In a large bowl, whisk together flour, sugar, pumpkin-pie spice, baking powder, baking soda and salt; set aside.

In a separate bowl, whisk together yogurt, butter, and egg. Make a well in the center of the dry ingredients and add yogurt mixture, stirring just until combined. Fold in carrots. 

Spoon batter into prepared muffin cups. Bake muffins until a toothpick inserted in the center comes out clean, about 20 minutes. Transfer to a rack. Serve warm or at room temperature.

*You can make your own pumpkin pie spice by combining 1 1/2 teaspoons ground cinnamon, and 1/4 teaspoon each of ground ginger and nutmeg.

Monday, January 2, 2012

Snickerdoodles


Usually when the holidays roll around all hopes of eating well are cast aside.  I can't help but eat all the delicious treats and home cooked food that's in front of me, and I usually eat a lot.  This year was no exception, especially since I was homesick and went a little nuts with all the holiday cooking.  Usually I don't feel too guilty or gross by the end of December, but this time I did, and I think these devil cookies did it for me.  They were so good that I literally made myself sick eating them (half batch next time Britt). What's not to love? A buttery, half chewy half cakey cookie, rolled in cinnamon and sugar, and it's called "snickerdoodle"? Um..yes please!

Usually a snickerdoodle cookie calls for cream of tartar and baking soda.  Having never made these cookies myself, I really wanted to use an original recipe, but I could not find cream of tartar at any of the expat stores.  Desperate to find an alternative, I of course did a Google search and found these.  In place of cream of tartar and baking soda, this recipe calls for baking powder. DONE. I was all over these the next day, and the apartment smelled like buttery cinnamony (which is so a word) heaven.  I would like to try them with the cream of tartar and will definitely do so when I return to America. If you decide to make these, just be careful. You will want to eat them all. 

Snickerdoodles
Adapted from Joy of Baking

Ingredients

2 3/4 cups all purpose flour
1/2 teaspoon salt
2 teaspoons baking powder
1 cup unsalted butter, at room temperature
1 3/4 cups granulated white sugar
2 large eggs
1 teaspoon vanilla extract
2 tablespoons cinnamon

Directions

In a large bowl, whisk together flour, salt, and baking powder.  In a separate bowl, beat the butter and 1 ½ cups sugar until smooth, about two or three minutes (I did this by hand as I don’t have an electric mixer here in Beijing *sigh*, but using an electric mixer would make your life a little easier). Add the eggs, one at a time, beating well after each addition. Scrape down the sides of the bowl and add the vanilla extract.  Add the flour mixture and beat until a smooth dough forms.  Cover and refrigerate for one to two hours, or overnight like I did.

When you’re ready to bake the cookies, preheat your oven to 400˚F and place rack in the center of the oven. If you have parchment paper, use it, it not there is no need to grease the pan.  Prepare coating mixture by combining remaining ¼ cup sugar and cinnamon in a shallow bowl.

Shape the dough into 1 inch round balls. Roll the balls of dough in the cinnamon sugar mixture and place on prepared cookie sheet, spaced about 2 inches apart.  Then, using a bottom of a glass, gently flatten each cookie to about ½ inch thick.


Bake the cookies for about 8-10 minutes, or until they are light and golden, but firm around the edges.  It is better that they are undercooked then overcooked! The centers of the cookies should be a little soft. Remove from oven, and let the cookies sit on the cookie sheet for five minutes, then transfer to a wire rack to cool completely. I highly recommend trying one before they’re completely cool. This recipe yielded roughly 3 dozen cookies.

Sunday, January 1, 2012

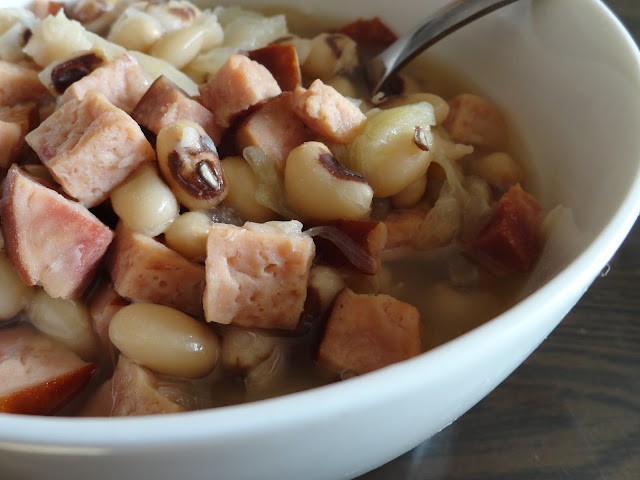
Black-Eyed Peas and Ham Soup

Happy New Year!  2011 was a complete whirlwind of a year.  I quit school and moved to China for a job, and boy has it been an adventure. I’m sure 2012 will be no different.  In fact, it will probably be 2011 in reverse.  I’ll most likely be leaving my job in June, and returning to school next fall to pursue a doctorate.  Though with this life I’ve chosen, I never really know where I’ll end up!  In the meantime, I’m just going to cook, eat, and be happy.  Now onto the food!

I adore soup.  Every year when the air outside starts to cool, I become obsessed.  I talk about it way too much and want to eat it almost everyday.  Give me a hot bowl full of awesomeness, a great piece of bread and I’m sold. Since I’m sort of from the south, and am totally crazy about soup, I thought of nothing better to make this New Year’s day than black-eyed pea and ham soup.  This is a traditional dish served on New Year’s day hailing from the southern United States.  Supposedly it will bring you good luck and prosperity for the coming year.  I will probably need some of that.  A lot of recipes I looked at had carrots, and celery, and tomatoes, and peppers, and collard greens, and and AND!  Though I’m of course not opposed to any of these things, and would like to try some variations, my mom made this for me once, and I remember it only had ham, onions, and black-eyed peas. Being a bit homesick, I ultimately wanted a taste of home, and I really liked it, just as it was. The peas have a meatiness to it that pairs perfectly with the ham. Like many soups, I’m willing to bet this will taste even better reheated. Some cornbread would’ve been a great pairing with this soup, but I’ve made corn bread two or three times in the past few weeks, so we just had a slice of French bread.  I have a feeling this will become a tradition of my own in the years to come, and I’m sure I will branch out a bit and try some new variations.  Here’s to 2012!


Black-Eyed Peas and Ham Soup
Inspired by Southern Food

Ingredients

16 ounces frozen black eyed peas
4 ounces cooked black forest ham, diced into small cubes
5 cups water
1 small to medium sized yellow onion, diced
2 cloves garlic, minced
A pinch of ground red pepper
1/8 teaspoon sugar
Salt, to taste (I used about ½ a teaspoon)

Directions

Place water and ham in a large pot, and bring to a boil.  Lower heat, and simmer for 30 minutes (now is a good time to prep the onions and garlic!).  Add remaining ingredients, and bring back to a boil.  Cover tightly and simmer for 45 minutes or until peas are tender.

Welcome!

Hello!

I couldn't think of a better way to start off the New Year then to get this blog going! This idea has been in my head for a while now, and though I feel like I'm a few years behind the food blog boom I couldn't be more excited to get going. I'm still working on the design, but figured that shouldn't stop me from writing.

Let's eat!
Related Posts Plugin for WordPress, Blogger...