Showing posts with label Cheese. Show all posts

Saturday, April 27, 2013

Classic Sour Cream-Topped Cheesecake

Thursday was Chris' birthday. Every year I ask him what cake he wants, and he always says cheesecake. Even when I ask what kind of layered frosted cake he likes best, he doesn't budge, still deeming cheesecake the best. Honestly, who can blame the guy. Cheesecake is incredible, and also one of my favorites. It's such a treat to have cheesecake, since I hardly ever make it. Now that I think about it, I only make it once a year for his birthday! That being said, I think this is the best cheesecake I've made yet. It didn't crack at all which is an achievement by itself. Look how perfect it came out!

Since Chris had a 30-page paper due on his birthday (gross) and I had a concert in the evening, we celebrated with a small potluck last night. It was an interesting menu to say the least. We had a beautiful spring salad with goat cheese, pistachios, and dried cranberries, topped with a fig walnut vinaigrette (thanks Katelyn!), I made rice to go along with some awesome pinto beans (thanks Dan!), a very authentic Bah Kut Teh (thanks AikKhai!), a baguette, red wine (thanks Megumi!), and this cheesecake I made for my honey. It was such an odd combination, but I wouldn't have had it any other way. It was a great night, with good company, delicious food, and a rather intense puzzle (still working on it guys!). We are very fortunate to have such wonderful people in our lives. 
 

Anyhoo, back to the cheesecake! It was super easy to prepare, and I can't recommend it enough. This recipe didn't come from a big name magazine or website like Cooks Illustrated or Bon Appetit, but instead came from good ole Kraft. It's classic, simple, and perfect. If you're looking for a no frills recipe, I think this is it. It also makes for a great breakfast if I do say so myself! Enjoy!

Classic Sour Cream-Topped Cheesecake

Ingredients

1 cup graham cracker crumbs
1 cup plus 2 tablespoons sugar, divided**
3 tablespoons butter
3 8 oz. packages cream cheese, softened
1 teaspoon lemon zest
1 tablespoon fresh lemon juice
1 1/2 teaspoons vanilla, divided
3 eggs
1 1/2 cups sour cream

Directions

Preheat oven to 325F.

Mix together graham cracker crumbs, 3 tablespoons sugar, and butter. Press onto bottom of a 9-inch spring form pan. Bake for 10 minutes.

While the crust is baking, beat together cream cheese, 3/4 cup sugar, lemon zest, juice, and 1/2 a teaspoon of the vanilla, until well blended. Add eggs, 1 at a time, beating on low speed after each just until blended. Pour over prepared crust.

{I then placed a small metal bread pan in the oven with some hot water in it. I had intended on doing a water bath, but forgot. I don't know whether it did anything or not to prevent the cake from cracking, but it obviously didn't hurt!}  

Bake for 55 minutes to 1 hour, or until the center is almost set. Mix sour cream, remaining sugar, and remaining teaspoon vanilla until well blended. Carefully spread over cheesecake. Bake 10 minutes. Run a knife around the rim of the pan to loosen the cake. Cool before removing rim.

Refrigerate 4 hours before serving. Eat plain, or top with jam or a fruit compote (I had some leftover strawberry compote I made. Num!).

**I kept the sugar in a separate small bowl through out the whole process. I took what I needed, so in the end I dumped what was remaining into the sour cream for the topping.

Recipe Source: adapted from Kraft

Friday, October 26, 2012

Baked Rigatoni with Chicken Sausage

Um...so what happened to October? Is my favorite month of the year nearly over?? NOOOO. I'm pretty sure I just made pumpkin pancakes last week, not two and a half weeks ago, and why have I not been consuming all things pumpkin every day since? I'll have to get on that.

Though I am a sucker for soups and stews when it cools down outside, I gotta say, I love baked pasta. I especially love this baked pasta. I first had this dish when I visited home last year during the Chinese new year, and have been aching to make it ever since. I bought gorgeous pesto chicken sausage from Findlay Market specifically for occasion. It did not disappoint. 

An added bonus about this recipe is that it yields two separate casseroles, and one can be put in the freezer to bake later on...MAJOR perk for a doctoral student. The dish in the photos are of the second batch that was frozen. I didn't read the directions very well and went ahead and baked it, then froze it, which you're not supposed to do. It was just a little more crunchy on top, so if you make this, it'll look a little different. It was of course still delicious. 

Ugh, this is putting my current dinner to shame. Enjoy!

Ingredients

Coarse salt and ground pepper
1 tablespoon olive oil
1 medium red onion
4 cloves garlic, minced
1/4 cup vodka (optional)
1 28-ounce can crushed or diced tomatoes
1/2 teaspoon dried oregano
1/2 cup heavy cream or half and half
1 pound rigatoni
10 ounces frozen spinach (excess liquid removed)
12 ounces smoked chicken sausage, halved lengthwise and sliced 1/4 inch thick
6 ounces mozzarella cheese, 4 ounces cut into 1/2 inch cubes and 2 ounces coarsely grated
1/4 cup Parmesan cheese

Directions

Bring a large pot of salted water to a boil. Heat oil in a large skillet over medium heat. Add onion; cook until translucent, about 3 minutes. Stir in garlic. Remove from heat; add vodka, if desired, and return to heat cooking until almost evaporated, about 1 minutes

Stir in tomatoes and oregano, and cook until tomatoes are falling apart, about 10 minutes. While that's simmering away, squeeze excess liquid from spinach and add to the pot. Cook for another 5 minutes. Add cream, and cook until warmed through, about 5 minutes. Season sauce with salt and pepper.

Meanwhile, preheat oven to 400F. Cook pasta in the boiling water until al dente, according to package instructions. Drain, and return contents to pot.

Add tomato sauce, sausage, and cubed mozzarella to the pot, tossing to coat. Season with salt and pepper. Divide evenly between two shallow 1 1/2 quart baking dishes. 

Top with grated mozzarella and Parmesan. Bake until browned and edges are crisp, 20-30 minutes. 

Freezer friendly: like I said above, one of the dishes can be frozen for up to 3 months! If you plan on freezing, stop once you put the pasta/tomato mixture in the baking dish. This means do not add the grated cheese yet. Allow the dish to cool, then wrap tightly in plastic wrap, and place in the freezer. Once ready to eat, remove from the freezer, add the grated cheese, cover with aluminum foil, and bake at 400F for 1 1/2 to 1 3/4 hours. Remove foil, and bake for an additional 20-30 minutes, or until browned. Do not thaw before baking. 

Recipe Source: adapted from Martha Stewart

Sunday, September 16, 2012

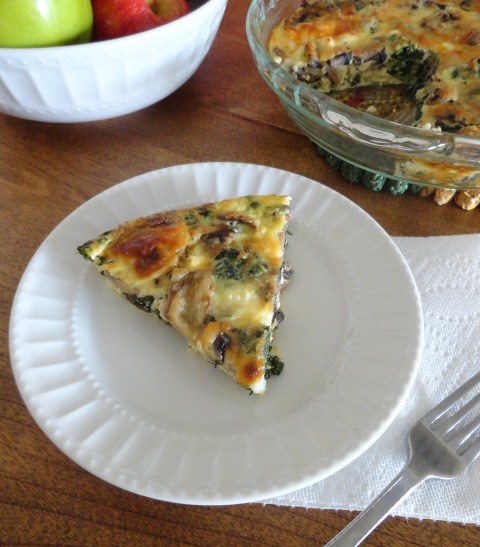
Crustless Spinach and Mushroom Quiche

Can you tell I've been trying to get more spinach into my diet since I got back from China? I have two bags of frozen spinach in the freezer and a bag of fresh in the fridge! The fact is, I love spinach, and it was one of those things I had a hard time finding in Beijing.

This quiche is loaded with spinach and was quite tasty the way I made it, but you could easily sub or add whatever you want. Kale? Peppers? Um...bacon? (yes please!) Just be sure that whatever you do, you get as much moisture as possible out of the veggies. Fresh from the oven, mine was barely wet on the bottom, which didn't really bother me. This wasn't an issue the following day(s).

I'm also trying to get more greens into my diet, so stay tuned for more green recipes!

Ingredients

10 ounces frozen chopped spinach, thawed 
8 ounces fresh mushrooms
1 garlic clove, minced
4 eggs
1 cup milk
2 ounces feta cheese
1/2 cup shredded mozzarella 
Salt and pepper to taste

Directions

Preheat your oven to 350 degrees. Squeeze as much water as you can out of the thawed spinach. I used paper towels to absorb the water, though you could also use a dishtowel to ring the water out.

Quickly rinse the mushrooms and slice them thinly. Place the sliced mushrooms in a skillet coated with non-stick spray, and sprinkle a little salt and pepper. Turn the heat on to medium-high and saute the mushrooms until they release all of their moisture and no more water remains on the bottom of the skillet, about 5-7 minutes. Add the garlic about a minute or two before the mushrooms are done.

Spray a pie dish with non-stick spray. Spread the spinach out on the bottom of the pie dish. Next add the cooked mushrooms and crumbled feta.

In a medium bowl whisk together the eggs until fairly smooth. Add the milk, 1/4 cup of the mozzarella, and another small sprinkle of pepper. Whisk to combine. (This step can be completed while the mushrooms are cooking). Pour this mixture into the pie dish over the spinach, mushrooms, and feta.

Sprinkle the rest of the mozzarella cheese over top. Place the quiche into the preheated oven and bake until it is golden brown on top and the center is solid. Every oven is different but this should take between 45 minutes and an hour.

Recipe Source: Budget Bytes

Monday, August 20, 2012

Spinach Feta Turkey Burgers

I can't believe it's been a whole month since my last post! In my defense, I moved AGAIN, was out of town for a week, and didn't get internet until yesterday (does happy dance!!). I still haven't unpacked all of my things, though I've been trying to do a little bit each day. My kitchen however, has been unpacked and functioning since maybe my second or third day back in Cinci. I have no idea where my tools or clothes are, but I can tell you the exact location of all my kitchen utensils and appliances.

I've been doing some cooking, but between unpacking and preparing for an audition and school, cooking has been on the back burner. Since school starts a week from tomorrow, I plan on preparing several meals that can be frozen, so if I'm short on time, I have something homemade and ready to go! These turkey burgers were the first on my list. I simply froze the patties I wasn't cooking on a parchment lined cookie sheet, then threw them in freezer bags once they were solid.* I made them yesterday for lunch, and they were totally delish. Let's just say in the two minutes I was taking pictures of mine, Chris had prepared his, eaten it, and put his dish in the sink. Either he was starving, or he loved them.

Not only were these tasty, they were also super quick to make. Even if I was short on time during the week, I could have these going in no time. I adapted the original recipe a tad, by adding garlic and fresh oregano (from my balcony garden!!), which I think were excellent additions. The only thing I would do differently next time is perhaps get some of the moisture out of the spinach, as the burgers were a bit on the soft side. I ended up freezing them for 10-15 minutes before cooking, so they'd hold together, as was recommended by others who had tried the recipe.

Bottom line, these put plain old turkey burgers to shame, and I'm super stoked that I have another three in my freezer!

Spinach Feta Turkey Burgers

Ingredients

1 lb. ground turkey
1 egg, lightly beaten
5 oz. frozen spinach, defrosted (about half a bag)
3/4 cup feta cheese
1 clove finely minced garlic
A few sprigs of fresh oregano, chopped (optional)
1 teaspoon salt
Pinch of pepper

Directions 

Using paper towels, remove excess liquid from defrosted spinach.**

Mix all ingredients with your hands or a wooden spoon, and form patties. If patties are too soft, put them in the freezer on a parchment lined cookie sheet for about 10-15 minutes. Cook patties in a greased skillet over medium-high heat for about 6 minutes per side, or until meat is fully cooked. Serve with hamburger buns, lettuce or spinach, tomato, red onion, and oh yeah, Dijon mustard on these is awesome. Do you know what's even more awesome then all of those toppings? More feta on top. Yeah.

The original recipe said this yields 4 medium patties, but I ended up with 5 large patties.

*When I want to eat them, I plan on letting them thaw just a few minutes then throwing them on the grill or skillet, just like I would a regular hamburger.

**I didn't remove the excess liquid from the spinach. They were a tad on the soft side, but obviously didn't bother me at all. If you're worried about it, go ahead and remove some of the moisture.

Recipe Source: Eat Live Run

Friday, February 10, 2012

Pasta with Roasted Garlic and Vegetables


I can't believe I've had this blog for a little over a month, and have yet to post a pasta recipe! This is shocking considering how much Chris and I love a good pasta dish. I've been following Kelsey's blog Apple a Day for a while now, and it was one of the blogs that inspired me to start one of my own. I appreciate the interesting dishes she chooses to present, and on my list of things I want to cook, many dishes come from her blog (I'm making a soup today I found there as well!).

While perusing through some of Kelsey's "Meatless Monday" dishes, I found this little gem. To be honest, I didn't really read what she wrote about this dish until later on, because the description started out with "Two. heads. of garlic." I immediately jumped down to the picture and recipe, and added it to my list. If you know me at all, I love everything and anything that has tons of garlic in it. The more garlic, the better.

This dish was easy to make, as the hardest part was having to wait so long for the garlic to roast (the apartment smelled incredible). I sadly didn't add the toasted walnuts, because mine were a little "iffy", and used about 1 1/2 teaspoons dried parsley instead of fresh (one of the many things I can't find in Beijing..sigh). I think this recipe would be a great base for experimentation. You could try adding a meat or fish, mix up the veggies, or try different cheeses. This combination however, was delicious, and I will definitely make it again.

Pasta with Roasted Garlic and Vegetables

Ingredients

2 heads garlic, papery skins removed, top quarter of heads cut off and discarded
6 tablespoons plus 1 tsp. extra-virgin olive oil
3/4 lb. cauliflower
3/4 lb. broccoli
1 teaspoon salt, plus more to taste
1/2 teaspoon black pepper
1/4 teaspoon sugar
1 lb. pasta (short shapes work best)
1/4 teaspoon red pepper flakes, plus more to taste
3 tablespoons lemon juice, plus more for serving
2 tablespoons fresh parsley, chopped and divided
1 cup Parmesan cheese
1/4 cup toasted walnuts, chopped

Directions

Preheat oven to 500˚F (my "oven"/easy bake only went up to 475˚F and I had no problems). Adjust oven rack to middle position, and place a large rimmed baking sheet on rack.

Place garlic heads, cut side up, in middle of a 12x12 piece of foil. Drizzle with 1 teaspoon olive oil and seal packet. Place packet on oven rack (not on pan) and roast until garlic is very tender, about 40 minutes. Open packet and set aside to cool.

While garlic is roasting, cut cauliflower and broccoli into florets. Place in a bowl and toss with 2 tablespoons olive oil, 1 teaspoon salt, black pepper, and sugar.

When garlic is done, carefully remove baking sheet from the oven. Spread cauliflower and broccoli on pan and place in oven to roast, about 15 minutes.

Bring 4 quarts of water to boil in a large pot. Add 1 tablespoon salt and pasta. Boil until al dente, according to package directions.

While pasta is cooking, squeeze or spoon garlic from skins into a small bowl. Mash with a fork to form a smooth paste, then stir in lemon juice and red pepper flakes. Slowly whisk in remaining 1/4 cup olive oil.

Drain pasta, reserving 1 cup cooking liquid, and return pasta to pot. Add vegetables, then stir in garlic sauce, 1/4 cup cooking liquid, 1 tablespoon parsley, and 1/2 cup cheese. Adjust consistency with additional cooking liquid and season with salt, pepper, and additional lemon juice (I felt that there was enough lemon flavor in the garlic sauce, and chose not to add any more). Serve immediately, garnished with remaining cheese, parsley, and walnuts.

Recipe Source: adapted from Apple a Day
Related Posts Plugin for WordPress, Blogger...