Friday, March 9, 2012

Delish Oatmeal Raisin Cookies


Two days ago, I was preparing to share a cake with you all. It was a rustic apple torte. The picture with the recipe looked great, and I thought mine came out pretty good looking too. I didn't think about it until after the cake was already in the oven, but there was no fat in the cake. No oil, no butter, nothing! As expected, the cake was dry, and a few hours later, a brick. I don't think I've ever messed up a cake! Needless to say, I was very disappointed. Thankfully, the biggest cake I can make in the "easy bake" is only 6-inches, so not too many ingredients were wasted. The next day, since my cake was two seconds away from going in the garbage, I still had a sweet tooth. That's when I remembered I had a recipe in an e-mail I sent myself months ago for oatmeal raisin cookies, and all of a sudden I had to have them immediately. I titled the e-mail Delish Oatmeal Raisin Cookies, hence the title of this post. My mom gave me the recipe over the phone, claiming they were the best oatmeal cookies she's ever had. She collected the recipe from a fellow teacher at her school, who brought them in one day. 

I honestly can't tell you the last time I had an oatmeal raisin cookie. They're one of those cookies that seem like they could easily be forgotten. Poor cookies. After my first bite, I literally "mmmmm"-ed out loud. They bring you back to childhood, or visits with your grandmother, or snuggling under a warm blanking on a rainy day. They bring you home.

These cookies were wonderfully delicious. The first bite I took, I was reminded of a macaroon: lightly crisp on the outside and gooey chewy on the inside. Of course, this was 3 minutes out of the oven. In true oatmeal cookie fashion, once cooled completely, it wasn't quite the same. It was a little more crunchy on the edges and slightly chewy on the inside. Still scrumptious, but in a different way.

The original recipe says the baking time is 10-11 minutes. As I learned during my quest for the perfect chocolate chip cookie, under baking is key to a softer cookie. Therefore, I took mine out after 9 minutes, and one batch I took out after 8. The 8 minute batch looked way underdone, so I put it back in for another minute. Looking back, I actually think it would've been fine, and next time I think I'll just trust that they're finished and see what happens. I hope you enjoy this little piece of home!

Delish Oatmeal Raisin Cookies


Ingredients

3/4 cup all-purpose flour
3/4 teaspoon salt
1/2 teaspoon baking soda
1/2 teaspoon cinnamon
3/4 cup unsalted butter, softened
3/4 cup granulated sugar
3/4 cup packed light brown sugar
1 egg
1 tablespoon water
2 teaspoons vanilla
3 cups uncooked old fashioned oats
1 cup raisins


Directions

Preheat oven to 375F. Grease cookie sheets, or line with parchment paper. In a medium bowl, combine flour, salt, baking soda and cinnamon. In a separate, larger bowl, beat butter, granulated sugar, and brown sugar until light and fluffy. Add egg, water, and vanilla; beat well. Add flour mixture and mix until just blended. Stir in oats, then raisins.

Drop dough 1 tablespoon at a time, onto prepare baking sheets. Cookies should be about 2 inches apart. Bake for 8-10 minutes (depending on your oven), or until golden brown. Let stand on cookies sheets for 2-3 minutes, then transfer to a wire rack.

Just an FYI: I halved the recipe, and it yielded about 22 cookies. This was yesterday, and we now have about 7 cookies left. Maybe I should've made the full batch? :)

Recipe Source: adapted from Cookie Jar Classics (I can't find the book online...sorry!)

Tuesday, March 6, 2012

Chickpea Salad

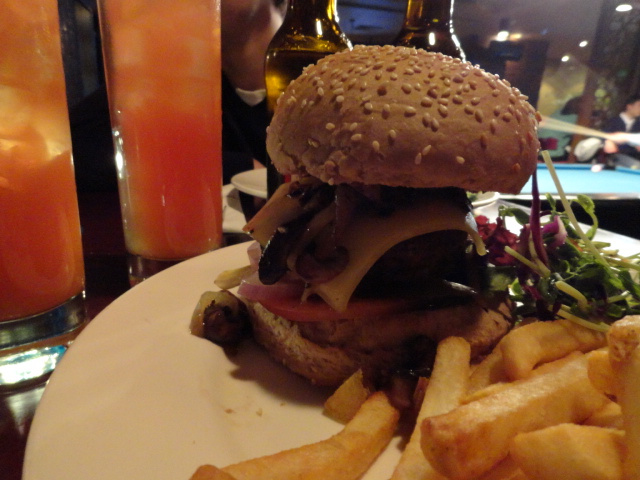
We have been eating a LOT lately. Two nights ago it was pizza, and last night was extreme burger madness at our favorite burger place in Beijing, The Blue Frog. Their burgers are awesome, there are always tons of expats there, and on Monday nights the burgers are buy one get one free!! We hadn't been in about a month and a half, so I was looking forward to going last night. As we were ordering we were informed that the drinks were also buy one get one free...double score! I can't remember the name of the drink I got, but I do remember it having vodka, cranberry juice, and orange juice. Oh yeah..and the name started with an 'M'. It was a bit strong for me, but nevertheless delish (and pretty!).

And what burger did I order? I was super close to ordering the Portobello burger. It had hummus, watercress, peppers, and of course a large portobello mushroom. I thought it would be healthier, but you wanna know what I got? The mushroom. Yes..loads of mushrooms and Swiss cheese over beef. But hey..the bun was whole wheat! ;) I think next time we go though, I'll give the portobello a try, because it did look super tasty.                                                                                                                                                                                                                    
The thing is though, between pizza and burgers, my body was craving something light and green for lunch todayI wanted to make a chickpea salad for a few days now, and this one fit the bill perfectly. It was refreshing, crisp, and light, not to mention the vinaigrette was also wonderful. I ate about one large bowl full, and two kiwis for "dessert". After eating this salad, I’m starting to get super excited about spring, and can’t wait to eat all the fresh produce!

In a way it almost seems silly to write out a recipe for a salad, but at the same time, I would've never made this if I hadn't seen this recipe first. Therefore, try and think of this as a guideline, and get creative! My changes were using cherry tomatoes instead of Roma (they're a little sweeter..and easier to cut!), and adding cucumber. I LOVE cucumbers in salad. They're so crisp and fresh, I just adore them. If feta weren't so insanely expensive, I would've loved to have added some! In the end, I just loved this salad, and my body felt full and happy. Enjoy!

Chickpea Salad

Ingredients

For the Salad
2 hearts of Romaine lettuce (or one big one)
1 bunch of green onions
1 red pepper
1 cup cherry tomatoes, halved
1 large cucumber
1 can chickpeas, rinsed and drained
2 large garlic cloves, finely minced or pressed

For the Dressing
1/8 cup olive oil
2 tablespoons red wine vinegar
1 ½ teaspoons brown sugar
A dash of salt
A dash of pepper

Directions

Wash and chop the lettuce, green onions, red pepper, cherry tomatoes, and cucumber. Add in the garlic and chickpeas and give it a toss.

In a small jar, add the olive oil, vinegar, salt, and pepper. Give it a shake, and drizzle over the salad to lightly coat. Add freshly ground salt and pepper.

Recipe Source: adapted from Beloved Green 

Sunday, March 4, 2012

Pasta with Roasted Red Pepper Sauce

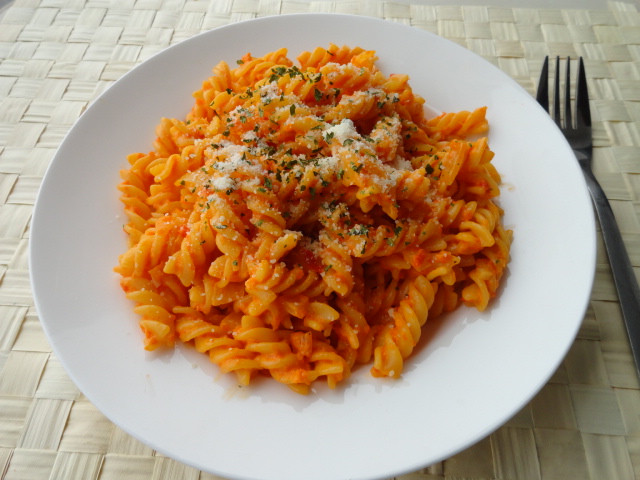
I've recently stumbled upon the Pioneer Woman's website, and I'm totally hooked. She has great photos, and her writing has so much character. Ree (Pioneer Woman) loves pasta, and the second I saw this one on her blog, I added it to my list of things to make. Peppers in China are actually quite inexpensive, so I thought this would be perfect to make while I'm here, as peppers can be pricey in America.

We really enjoyed this roasted red pepper sauce. Though I do love a good basic tomato sauce, it can sometimes be a little acidic for me. The red peppers offered a welcome change, and were slightly sweet with smoky roasted goodness. The only suggestion I have if you make this is to not be afraid to add salt (it really needs the salt!!!), and maybe more garlic. The original recipe called for two cloves, but I think three would be better. More garlic is always better! I also didn't have the pine nuts (they're so expensive..gah!), but would be curious to try it out. Apparently it does add a strong flavor, so if you're not sure if you'd like it, maybe leave it out, or only add a little bit. 

Pasta with Roasted Red Pepper Sauce


Ingredients

3 whole red bell peppers
2 tablespoons pine nuts (optional)
2 tablespoons olive oil
1/2 a whole medium onion, finely diced
3 cloves garlic, minced
1/2 cup heavy cream
1/2 pound to 1 pound pasta: Orecchiette, Penne, Fusilli, etc.
Flat leaf parsley, finely minced
Parmesan, shaved or grated


Directions

First, roast the red peppers. You can do this a number of ways: either on the grill, in the oven (450°F for 30 minutes..be sure to keep an eye on them, and turn every 10 minutes or so),  broiler, or directly on the stove top burner. I opted for the burner. Regardless of how you roast them, be sure you keep an eye on them, and make sure they get good and black. Once roasted, place them in a Ziploc bag to allow to sweat, for 15 minutes (a little longer if you can). Peel the charred skins from the peppers, them remove the membranes and seeds; set aside. 

If adding pine nuts, lightly toast in a skillet over medium-low heat for about five minutes minutes; set aside.

Puree the peppers and pine nuts; set aside. 

Cook pasta according to package directions.

In a skillet or pot over medium heat, drizzle in olive oil. Add diced onions and garlic and cook until soft. Pour in pepper puree and stir together. Add plenty of salt. Pour cream and stir to combine. Taste and add more salt, if necessary. Add half of cooked pasta, and continue to add until desired pasta to sauce ratio is achieved.

Place pasta into a bowl, and top with chopped parsley and plenty of shaved Parmesan.

Saturday, March 3, 2012

Bok Choy with Bacon

I never had bok choy until I moved to China. I would always see it in grocery stores, but never knew what to do with it. Do you eat it raw in a salad? Soups? Steamed? 

In China, most of the time it's served hot and wilted, usually cooked by a quick fry. The first time I had it in a restaurant here, I was immediately in love, and every time it's served on one of our trips, I scoop a big pile onto my plate. Since bok choy is so abundant here (and super cheap!) I decided I wanted to try cooking some at home. As you can imagine, we eat a lot of Chinese food, so Chris hasn't been in the mood for Chinese when we have another choice. Well, today Chris and Eloy went to play soccer with some people from our orchestra, so I had the afternoon to myself and decided I would make what I wanted: bok choy with bacon. 

I bought the bok choy weeks ago, and it kept amazingly well. When I first saw this recipe, I immediately added it to my list, because anything that has bacon in it has got to be a winner. Bacon is magical, period. I made this as a side to some rice with green onions and steamed dumplings. Of course it was amazing. Such a simple side dish with lots of flavor, and a little kick of spice. I think I made this awesome lunch from start to finish in about 20 minutes (and I'm not the fastest chopper..gotta take care of the flutie fingers!) If you're new to bok choy, or are searching for ways to cook bok choy (hi Katie!), give this quick and simple recipe a go. You'll really love it!

Bok Choy with Bacon

Ingredients

4 slices bacon, chopped
2 pounds baby bok choy, with ends cut off
1 teaspoon olive oil
1/2 a small red onion, chopped
1 teaspoon red pepper flakes
1-2 cloves garlic, minced
Salt to taste

Directions

Fry bacon in a large skillet over medium heat until crispy (or medium low heat, depending on your stove). Remove bacon, reserving one tablespoon grease in the skillet. Add the olive oil, onion, red pepper flakes, and garlic. Cook and stir over medium heat until the onions start to become tender.

Add the bok choy, toss, and place a lid on the pan. Let cook for 3-5 minutes. Remove the lid; cook and stir until the bok choy is tender but still crunchy, about 2 minutes. Stir in the bacon, and season with salt. Serve piping hot!

Recipe Source: adapted from AllRecipes.com

Thursday, March 1, 2012

Healthy Pumpkin Banana Muffins

Yes, I know fall was months ago, and yes, I know these muffins have pumpkin in them. I love pumpkin so much, I'll find an excuse to eat it any time of year, though it does seem to taste better when the air is crisp, and orange and red leaves are everywhere. This was another "pre-trip cleaning out the fridge/pantry/freezer" recipe I found. I had about four brown bananas, some pumpkin I froze back in November, and some yogurt that I still hadn't used up, even after making incredibly awesome pancakes. I made these for our trip to ChangChun, and only half of them made it to the train.

These little muffins were delightful. They were very moist, and became even more so after a few days. They were nearly perfect, except I felt that there was a little too much nutmeg for my taste. I adjusted the recipe accordingly, by reducing the amount of nutmeg by half. I was also really excited to make these because I got to use my cute cast iron muffin pan my mom got me for Christmas (Christmas with my family was about a month ago, so I haven't really had it that long). They're not mini muffins, and not the normal size either. They're juuuust right. Aren't they cute??

Healthy Pumpkin Banana Muffins

Ingredients

1 1/2 cups all-purpose flour
2 cups whole wheat flour
1/2 cup oat or wheat bran
4 teaspoons baking powder
2 teaspoons baking soda
1/2 teaspoon salt
4 teaspoons cinnamon
2 teaspoons ground ginger
1/2 teaspoon nutmeg
1 teaspoon pumpkin pie spice
3 ripe bananas, mashed
1 cup applesauce (I used plain yogurt instead)
15 ounces canned pumpkin
2/3 cup rolled oats
4 eggs, lightly beaten
1 cup granulated sugar
1 cup packed brown sugar

Directions

Preheat oven to 350F. Grease or line muffin tins with paper liners.

In a medium bowl, whisk together flours, bran, baking powder, baking soda, salt, and spices. In a separate bowl, combine remaining ingredients, and let sit for about 5 minutes so the oats will soften. Gradually beat in the flour mixture, and stir just until combined.

Spoon into prepared pans or tins, filling the cups until just about full. Bake for 25-30 minutes, or until toothpick inserted in the middle of the muffin comes out clean.

Recipe Source: adapted from Food.com
Related Posts Plugin for WordPress, Blogger...